
This is a message from Tom Yei, who has been battling prostate cancer for five years. His experience can help anyone who is newly diagnosed and their loved ones. Getting a diagnosis of prostate cancer can be scary and confusing. I hope this information will help. – Denise I am Tom, and I am […]
General
Inflammation and Anxiety

Joe came into my office anxious, overweight and suffering from IBS. Joe came to see me to lose weight, and Joe was surprised that nutrition therapy could help with IBS. We were both surprised that nutrition therapy dramatically reduced his anxiety. We worked together for eight sessions, over about five months. After the first […]
Calm Your Inflammation is Here!
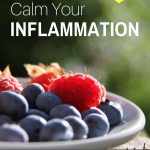
My first book, Calm Your Inflammation, is finally available and I want you all to be the first to know. Your kind words and support have been essential to this project and all of my work. This book has been a labor of love. It is a simple, easy-to-implement plan for transitioning to an […]
Aging in Place
Hello everyone! While I am finishing up my book, Kent Elliot has graciously agreed to give us the scoop on Aging in Place. Many of us want to stay at home during our golden years, and these modifications can make this a safe alternative. Enjoy! Safe at Home: Easy Accessibility Modifications for the Elderly Author: […]
Grill Like a Pro, Part 2: Meats

Cooking meats on the barbecue grill is one of the pleasures of summer, and if we do it right we can stay healthy at the same time. A fantastic marinade is one of the secrets to grilling meat like a pro. This one is my favorite and it is fantastic on chicken, beef, pork, fish […]
Fire Up Your Grill, Get Dinner Ready Fast

When the weather starts to heat up I turn to the grill to make a super-fast, healthy dinner that doesn’t heat up my whole kitchen. No dirty pots, pans or stove to clean either. You can make a whole meal on the grill in under 30 minutes., leaving you plenty of time to enjoy a […]